Wednesday, January 26, 2011

Rub-a-Dub-Dub, Cloth in a Tub


A laundry tub, that is!


Taking care of your diapers is an important part of cloth diapering, because you want to protect your baby’s bottom and the investment you’ve made. There are some guidelines that should be followed for prepping, washing, drying, and storing diapers. I will provide the most necessary information in this entry. Occasionally you may come across a special situation, and that will warrant more research- either mine or your own.


Prepping


Prepping your diapers is so essential because it allows them to be at their best when you put them on your baby. Most diapers require at least one washing and drying cycle to clean off any “factory gunk” and to increase their absorbency. The manufacturer should give you guidelines for prepping their diapers, but in general

you should remember the following:

  • Synthetic fibers should be washed and dried at least one time.
  • Natural fibers should be boiled to remove the natural oils, then washed and dried several times- often four or more cycles.

These prep washes can be a combination of plain water washes and cycles with detergent added. Drying between these washing cycles increases the absorbency and will give you the best results.


Washing & Drying


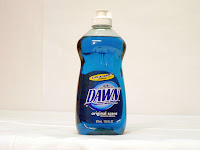
It is a good idea to wash your diapers every two or three days- the longer they sit, the more difficult it will be to get out any stinky build-up. Your first concern will be finding a cloth-diaper-safe laundry detergent. The website pinstripesandpolkadots dot com has a fabulous resource for comparing detergents and finding a safe option. Ideally your detergent will be free from dyes, perfumes, enzymes, optical brighteners, and any fabric softening additives. These components will hinder the effectiveness of your diapers and can cause damage over time.


There are specialty detergents available, usually online, that are CD safe. Some examples include Rockin’ Green, which is a parent favorite; Jenny’s Simply Clean, which is one of my favorites (for baby clothes and pail fresheners, too!); and Tiny Bubbles, which is made by GroVia and is a great option. A cheap alternative that I recently tested is Tide Original Powder. It got the diapers just as clean as Tiny Bubbles or Jenny’s, and it is very affordable- plus I already use it for the rest of our household laundry! Note: When using a “normal” detergent such as Tide powder, you only need to use about one-quarter of the normal amount for your load size! Using too much detergent will cause build-up, which can lead to moisture wicking and smelly diapers. Lastly, remember that fabric softener is never safe for your diapers!


It is up to you to experiment and find the best washing ritual for your own diapers and washing machine. In general, the following is suggested:

-Rinse solids off of the diaper before storing in a dry pail. Breast fed babies’ diapers do not need to be rinsed off prior to storage. The waste will wash clean in the machine since it is completely organic.

-Run a pre-wash soak or a first cycle with no detergent. I always add half of a cup of vinegar and about seven drops of tea tree oil to this pre-wash. Using the vinegar will help to break down the ammonia in your diapers, and will keep them soft. Tea tree oil has antibacterial properties and can help to combat potential pitfalls like yeast. As a side note, hot water is optimal for this first cycle, but cold water will work- I know because my only laundry option is cold, and I don’t have any problems!

-A wash cycle with detergent follows, remembering to only use the recommended amount of detergent on your diapers.

-End with at least one final rinse cycle to remove all of the detergent.

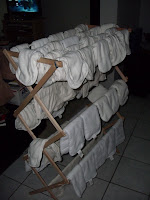
Drying may require some special attention. Most moms say that drying on low heat is best when you use a machine dryer. Even more moms will say that the sunlight is the optimal drying option, as it removes stains and sanitizes your diapers. If you live in a place with little sunshine (like myself, sadly), you should remember that frequent drying of PUL shells and elastic can lead to premature aging of the diaper. Personally, I opt to hang my covers on a drying rack and use the machine to dry all of my inserts more quickly. An occasional run through the dryer is good for PUL, as the heat will reseal the material and help it stay waterproof.


Storage & Long-Term Care


Over time, you will notice some unsightly stains and possibly some odors building up on your diapers. You have a number of options to combat these nuisances. As I already mentioned, the natural power of the sun will help you to keep your diapers sanitized and will reduce staining. Tea tree oil, vinegar, and even bleach are a few examples of additives that may be included in the wash to combat smell and stains. Pinstripes and Polkadots has a great resource for reviewing the pros and cons of various laundry boosters. At some point, you may need to take an extra step called “stripping” to rehabilitate your cloth. (I have already discussed diaper stripping in a recent post.)

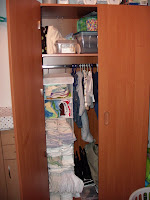
Storing your diapers can easily be done in a bedroom, laundry room, closet- the possibilities are limited only by your own space and creativity! I store my son’s diapers in a hanging shoe rack in a closet. Some people use decorative baskets, some build shelving, some simply use the drawers on a changing table or dresser. Some even use a hanging diaper caddy. As your stash grows, storage can become more challenging, but think outside the box and surely a solution will come to you! For long-term storage, be sure to keep your clean and completely dry diapers in an air-tight container. This will help to keep the elastic from becoming dry and brittle over time. Voila, you have diapers all ready for your next baby- or for a swap board sale!


Preparing yourself ahead of time, if you make the decision to use cloth before baby is born, will greatly assist you in your goal. But even if you are thinking of switching from disposables, don’t let the prep work overwhelm you! Do a little at a time if that works best for you, and gradually convert to cloth use. Getting into a routine, and making sure that you wash frequently enough to not run out of diapers, are the keys to cloth diapering success. Once you get started and find your own groove, you’ll be amazed at how easy it all can be!

Tuesday, January 25, 2011

Cloth Wipes = $$ Savers!

While I was very thankful to get a bunch of disposable wipes at my baby shower, I realized pretty quickly after Owen arrived that wipes don't last long! I didn't relish the idea of having to buy them constantly. He started to develop some redness and I noticed that it was decreased when I used the GroVia wipes, which are free of perfumes. Those are more expensive than the typical wipe brands available in brick-and-mortar stores, plus I would have to really stock up so that I didn't run out while I was waiting for an online order to arrive.

I knew I wanted something to combat the potential growth of yeast (since Owen and I had thrush at the time), and using most diaper creams will cause liquid repelling. Instead, I decided to nip the potential for yeast infections in the bud, and solve my issues with perfume reaction, and cost, all in one decision. Solution? Cloth wipes!

I use the cloth wipes from GroVia, but really you can use any absorbent cloth as a wipe. Some moms who are talented with a sewing machine will buy fabric, cut it into squares, and hem the edges so that the wipes don't unravel. Since you're going to be washing your diapers anyway, it is no extra work to wash your wipes.

Sometimes a dry wipe does the job very well, but of course there are times when a wet wipe is needed. For this, I make a solution and use my peri bottle from the mother-baby unit to apply it to the wipe! I'm considering buying a spray bottle at some point, but for now the peri bottle gets the job done. My recipe for the wipe solution is as follows:

1 cup water
1 Tbsp baby wash- any brand you like, the more gentle the better!
1 1/2 tsp olive oil
3 drops tea tree oil

I combine gently in a cup so the baby wash doesn't foam up, and then use a funnel to pour the mixture into the peri bottle. I shake it up before each use. The combination of cloth wipes and this easy at-home mixture is cost-effective and so simple to use!

Diaper Stripping

Over time, your diapers will accumulate build-up and begin to repel liquid or have a constant offensive odor- usually from the ammonia. For me, it took almost three months to notice the smell. I haven't had extreme issues with absorbency, but I have noticed a few leaks around legs and waist where they never used to show up. I decided two days ago that I should attempt to "strip" my diapers.

I was certainly feeling nervous about the task- there are so many ways that other mamas will suggest to strip diapers, and everyone has their own tailored method. I researched and devised my own plan of action, and I am very happy with the results!

My first attempt only included about one-third of my total diaper stash, because I wanted to make sure that I found a method that would work well and give me the results I desired, without having all of my diapers stuck in the wash for hours on end if something went wrong.

I began with my normal pre-wash: one cup of vinegar and eight drops of tea tree oil in
a large water load. (My washer is top loading, to give you an idea of the amount of water I deal with.) After the pre-wash, I did a second cycle and added one and a half teaspoons of the basic blue Dawn dish detergent. I decided to use Dawn as my stripping agent because I already have it in my kitchen, and it seemed less labor-intensive than boiling all the diapers!

After the Dawn cycle, I ran a third session with my normal amount of regular detergent- in this case, it was two scoops of Tiny Bubbles by GroVia. I finished with a final wash cycle of plain water with no additives, to make sure all of the detergents were cleaned from the diapers. Of note: be sure that your final wash cycle does not show any signs of bubbles from detergent. This is how you'll know you've rinsed them thoroughly.

I finished up with my usual drying pattern- inserts in the dryer on low heat, covers hanging from my drying rack. I am incredibly pleased with the result! No more nasty ammonia smell and my diapers are soft and even look a little bit less stained. I'll let you know how long it is before I have to strip again!

Thursday, January 13, 2011

So Many Options!

Now to address possibly the most overwhelming aspect of cloth diapering- all the diaper options! Having so many choices can feel like a burden, when really it should be a blessing. The way I see it, there is a cloth diaper for every need and occasion. I’ll outline the most common varieties here, along with a few brand-name examples. I’m going to briefly discuss pros and cons to the best of my ability. I encourage any experienced CDing mamas, if you are reading, to add your two cents regarding diaper options.

Here we go...

All-In-Ones (AIOs)

These diapers most closely emulate a disposable because everything you need is already sewn to the diaper. Your only task is to fasten it on your baby. When the diaper is dirty, you put the entire thing in your diaper pail. Many brands offer AIOs, and people have varying degrees of success with them. Just a few you might check out include BumGenius!, GroVia, and Bumkins.


Pros: Easy to use! Simple storage- no sifting through covers and inserts to find matches. Some are very trim. Great for use by a babysitter, daycare, grandparent, etc. Moisture-wicking fabrics available.

Cons: Can be slow to dry. More diapers required for full-time CDing. Some are pretty bulky. More to carry along when out of the house.


Pocket Diapers

This style is also quite similar to the design of a disposable diaper, with one notable difference. A pocket diaper, you may have guessed, contains a pouch in the diaper into which you stuff various inserts. The insert pulls back out once soiled, and both pieces go into your laundry bin. Some examples of pocket diaper brands include FuzziBunz, Rumparooz, Sunbabys, Thirsties, Happy Heineys, BumGeinus!, and Kawaii.


Pros: Fast-drying since the shell and insert will be dried separately. Customizable- you can place different types of inserts into the diaper, or double up for heavy overnight use. Usually a pretty trim fit. Easy to use, especially when pre-stuffed, for a secondary caregiver. Moisture-wicking fabrics available.

Cons: You have to stuff the pockets before using. More diapers required for full-time CDing. With extra inserts, can be very bulky. More to carry along when out of the house.


Fitteds & Covers

This option is hailed as one of the most trim available for a wee bum. A fitted fabric inner is fastened around baby completely. These fitted diapers often resemble a plain disposable diaper, but some have fun prints or colors. A waterproof cover is then placed over the fitted diaper. Depending on the material used for the cover, they can sometimes be reused between changes. Kissaluvs, v, and Mother-Ease are some popular examples of F&Cs. Wool covers are an option that seems to be growing in popularity. Wool has antimicrobial properties and does not need to be washed between every use. It is also very breathable.


Pros: Very trim fit. Less laundry to do. Wool covers are breathable and antimicrobial. Moderately easy to use. Fairly quick to dry.

Cons: Could be daunting for a secondary caregiver. More steps to fasten diaper on a squirmy baby. Wool is expensive.


Prefolds/ Flats & Covers

This style is what most people think of when they imagine cloth diapering, though with many advances you are not very likely to see CDing families using the old-school plastic pants! A piece of absorbent cotton fabric is wrapped and often fastened around baby, and a waterproof cover is added. Unlike fitteds, the inner part of the diaper is not already sewn to fit your baby’s shape. It is up to you to fold and fasten the insert around your child.


A “flat” is one large piece of woven fabric which can be folded up to add thickness and the shape desired- think origami with cloth. A “prefold” is the same fabric, already stitched into a smaller rectangle to create several layers of thickness. With both types, you can choose a folding style that works for you. Videos of folding styles can be found on YouTube from other CDing mamas. Most use some kind of fastener- pins are okay (protected ends, of course) but even easier and safer is a snappi. A snappi is a three-pronged soft plastic fastener with teeth on each end. The tension between the prongs holds the teeth in the fabric and keeps the diaper on baby. Of course there is always the lazy woman’s option- just trifold the fabric and lay it in the insert. Your cover is more likely to get dirty, but it’s a nice option when 3am arrives and you’ve barely had any sleep!


Covers come in many colors, patterns, and waterproof materials. A few examples include covers by Thirsties, Bummis, Imsie Vimsie, and Econobums; but there are many more!


Pros: Very cost-effective. Easy to prepare for use. Easy to clean.

Cons: Can be difficult to learn to fold and fasten. Moisture remains against baby’s skin.


Hybrid/ AI2 Diapers

These are my personal favorites for daytime use. Hybrid diapers really offer a wide variety of options to fit your lifestyle. Sometimes called AI2s (depending upon the construction), hybrids consists of a shell and some type of insert. The insert is usually specially made to lay in the shell. Most companies will make an organic cotton option, a combination microfiber and microfleece option (often called “stay dry”), and a biodegradable flushable option. You can mix and match the inserts based on your needs. For example, families who travel often for long periods of time might enjoy using the biodegradable inserts on a trip, because it cuts down on the amount of laundry and the smells associated with carrying dirty diapers around for a few days. Another great feature is that most of these diapers allow you to use the shell more than once before washing due to the type of fabric used inside. Examples of hybrids include Flips, GroVias, and gDiapers. Best Bottoms are also a great diaper, though they don’t offer the biodegradable option at this time.


Pros: Flexible and customizable. Easy to wash. Cost-effective. Fewer shells to purchase for full-time CDing. Covers can be reused several times in a day. Easily fit in diaper bag for days out or extended travels.

Cons: Most can be bulky on small babies. Buying biodegradable inserts will get costly. Some styles are not cut well for multiple cover uses.


There are a few more things to consider, namely your choice of sized or one-size diapers, and of snaps or velcro fasteners. Sized diapers can be great for getting the perfect fit on your baby, but of course you will need to buy more diapers overall in order to CD from birth through potty learning. One size diapers offer a way to save money because you won’t need to buy new diapers every time your baby outgrows a size, but they tend to be very bulky on newborns. One solution to this problem is to purchase one sized diapers for the majority of your stash, and to pick up a limited newborn stash of diapers to get you through those first few weeks. Of course if you are blessed with a “bigger” baby you might be fine going straight to OS diapers!


Snaps versus velcro ends up being a very personal opinion based on your own baby and your comfort with the diapers. Snaps can be more difficult to get a perfect fit, but they tend to stay in good shape longer. Velcro is a bit easier to fasten on a squirmy baby, while still achieving a snug fit around the legs and torso. Velcro (also called hook and loop) can wear out more quickly with frequent use. Additionally, many moms tell cautionary tales of their older babies figuring out how to undo the velcro and removing their diapers. Snaps are typically much more difficult for tiny hands to unfasten. Many diapers are now available in your choice or snaps or velcro, and some companies are making conversion kits for diapers that used to be exclusively available with velcro.


I’ve offered a lot of information, so how do you choose? The great thing about the cloth diapering community is, someone is always selling gently used diapers for a great price. This is good for you now- cheap buying options, and later- you can recoup some of your investment when you’re done with the cloth. Additionally, many online retailers offer trial packages that give you a variety of diapers to test for a period of time. You simply return the ones you don’t like, and then they resell them at discounted prices. (Oh hey, another way to save!) Purchasing a trial package is another one of those pieces of advice that been-there-done-that moms love to give. DiaperJunction dot com and KellysCloset dot com both have popular variety packs.


I personally believe that variety is key, especially at first. Pick up a few different brands and types of diapers because you can not be sure of what will work for you until you test them out. From my own experience, I can tell you that I thought I would never want to use AIO diapers because of the cons I listed. I ended up getting just a few to test out (BumGenius! Elemental OS) and it turns out I love them! I just don’t want my whole stash to be that particular diaper. They are great for night time, but I prefer my AI2s for daytime.


Think about which pros and cons matter most to you and your lifestyle. Prefolds / flats and covers will usually be the cheapest route, but for some people it makes more sense to buy a more expensive diaper that will last a long time and be more convenient for daily life. There are so many options that CDing is not what it was in the past. You can try different styles and customize your stash to fit your needs, budget, and personality.


Prepare Yourself! - Check out a diaper site (I am a huge fan of diaperjunction.com) and look at the diapers they sell by variety to get a feel for the look and construction of these styles. Do a search on ebay.com or hyenacart.com to see budget and work-at-home-mom options.